Action Recorder settings
Several global settings are available to affect the behavior of the TestArchitect Action Recorder.
To invoke The Action Recorder Settings dialog box, select Tools > Action Recorder Settings from the TestArchitect Client menu.
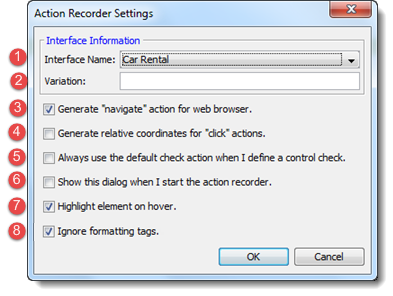
The Action Recorder Settings dialog box offers the following options:
Interface Name: Select the interface that the Action Recorder uses to match or update the windows and controls it encounters during recording.
Variation: Optionally select a variation specification applying to the interface entities that the Action Recorder uses to match or update windows and controls it encounters during recording.
Notes:- To specify keyword variations, type one or more comma-delimited keywords, such as, Spanish, Business.
- To specify a linked variation, type a name and its variation signature in the form of
<System>:<node1>, <node2>. For example,Browser:Chrome, Firefox.
Generate “navigate” action for web browser: This setting applies when you are recording manual actions on a web browser. When you navigate to a different web page, this setting causes TestArchitect to generate the navigate action containing the specified URL. Additionally, the action lines generated prior to the navigate are automatically commented out, and accompanied by the following description:
//It appears that you are trying to test a web-based application. TestArchitect has automatically commented out the actions generated prior to the 'navigate' action, //on the assumption that you may not want them executed during normal test automation.Notes:For browsers, the Action Recorder is currently supported only in Internet ExplorerGenerate relative coordinates for click action: For each click action, record the horizontal and vertical positions relative to the top left corner of the affected control or window, and populate the x and y arguments of the generated click action with those values.
Always use the default check action when I define a control check: If not selected, the Action Recorder prompts you to select the type of checkpoint action to record whenever you request a check using the Check
 button on the Recording toolbar.
Show this dialog box when start the Action Recorder: If selected, the Action Recorder Settings dialog box is displayed every time you start the Action Recorder.
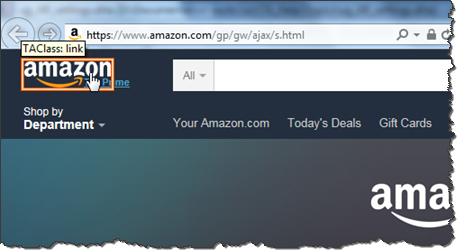
Tip:If you clear this check box, but want to reinstitute it at a later time, go to Tools > Action Recorder Settings.Highlight element on hover: While you are recording the test, as you move your pointer around the application, an orange, rectangular frame highlights whichever window or control the cursor is made to hover over, and displays the object’s TA class, to assist you in deciding where to click.
Notes:This option is currently supported only in Internet Explorer
Ignore formatting tags: Some HTML elements, such as formatting elements like <strong> or <em>, are not considered the ideal types of controls to automate against. In such cases, a containing element – that is, a parent, parent of a parent, etc. – is generally a better choice. With Ignore formatting tags, the recorder determines whether to record the specific element that is interacted with, or to navigate up the DOM hierarchy until a suitable element is found. It then generates the appropriate built-in action with the recorder’s choice of element specified as the control to be operated on.
Important:This option is currently supported only in Internet Explorer- For example, suppose that a <strong> HTML element is embedded inside a <link> element. During the recording process, you click on the <strong> element. Instead of recording that element, the Action Recorder records the <link> element by generating an interface element for it, and generates a click action with that interface element specified in the control argument.
Related concepts
Introduction to the Action Recorder
