Importing Team Foundation Server test suites to TestArchitect
Just as TFS test cases may be imported, test suites residing in TFS may be also imported into TestArchitect.
Ensure that you have already taken the following steps:
- Registered the TFS server with TestArchitect. (Learn more.)
- Mapped the TestArchitect project containing the test cases of interest to a TFS project. (Learn more.)
To import a TFS test suite into TestArchitect:
In the TestArchitect explorer tree, right-click the test node or test folder into which you want to import the TFS test suite. On the context menu, select External Tool > Visual Studio > Import from Team Foundation Server.
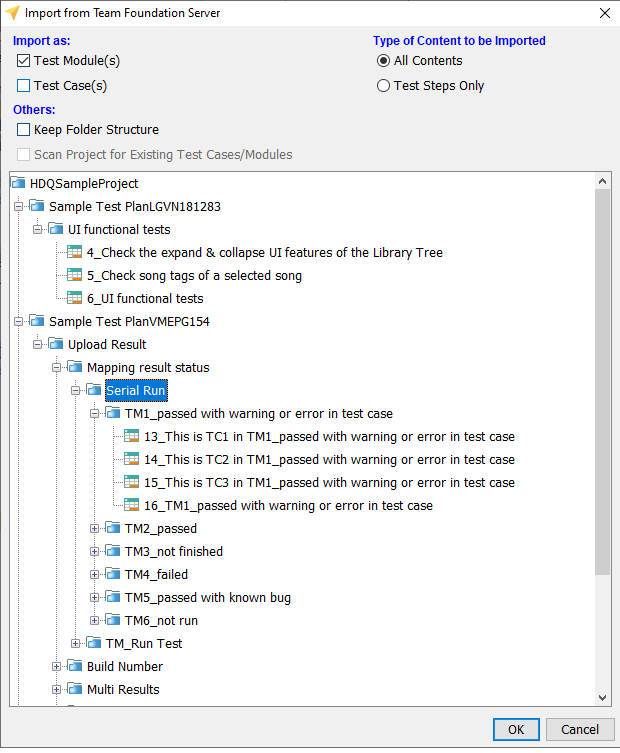
In the Import from Team Foundation Server dialog box, locate the TFS test suite you want to import into TestArchitect.

Select the preferred options:
Test Module(s): Create a test module in TestArchitect corresponding to each imported test case in TFS. The name of the test module is made up of TFS test case’s ID and test case’s title separated by underscore (_). For instance, 90_TC01.
Test Case(s): Create a test case in TestArchitect corresponding to each imported test case in TFS. The TFS test case’s ID will be mapped to the Source field and ID of the TestArchitect test case. The title of the TestArchitect test case is made up of TFS test case’s ID and test case’s title separated by comma (,). For instance, 90, TC01.
Remember:you must select either Test Module(s) or Test Cases, or both.All Contents: Import all contents of the TFS test cases into TestArchitect test cases/ test modules.
Notes:If you choose the All Contents mode, you can only import non-mixed test suites that:- do not contain both child test cases and child test suites.
- do not recursively contain any child mix mode test suites.
Test Steps Only: Only import all steps of the TFS test cases into TestArchitect test cases. The imported test steps will not be displayed in the test editor, but the Steps tab of the test case.
Keep Folder Structure: Organize the imported tests in Architect in a similar way to those in TFS.
Scan Project for Existing Test Cases/Modules: If selected, the whole TestArchitect project will be scanned for test cases/test modules that already exist. Otherwise, the selected test node will be scanned.
Notes:The Scan Project for Existing Test Cases/Modules function applies to Test Steps Only.
Click the OK button.
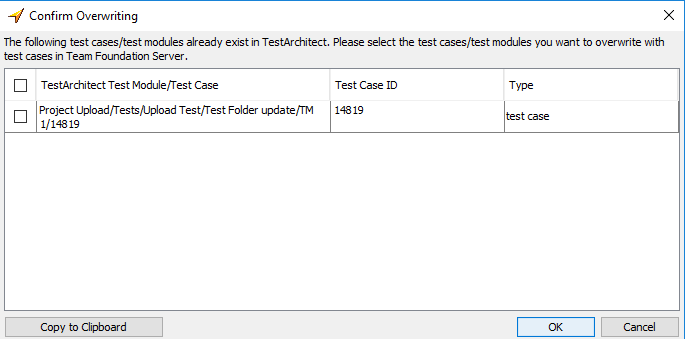
Only if you have chose the Test Steps Only option in the previous step, the Confirm Overwriting dialog box appears, showing the list of test cases/ test modules that already exists in TestArchitect. Select the check boxes for the TestArchitect test cases/ test modules that you want to overwrite with the TFS test cases. Click the OK button.
 Notes:The Copy to Clipboard button is used to copy the list of existing test cases to the clipboard.
An information dialog box will appear stating “The Importing process completed successfully” if the upload was successful. Click the OK button.
- If an imported TFS test suite contains test case(s), it will take the form of a test module in TestArchitect.
- If an imported TFS test suite contains child test suite(s), it will take the form of a test folder in TestArchitect.
Special Cases:
Some of the test cases that are being imported have the same ID. The Import as Test Case(s) option is selected.
- The test cases with the first occurrence of the duplicate ID will be imported normally.
- The remaining test case(s) with the duplicate ID will be imported. However, the source field of the test case(s) will be left blank, unmapped.
Some of the test cases that are being imported have the same title and ID. Import as Test Module(s) is selected; Keep Folder Structure is deselected.
- The test case(s) with the first occurrence of duplicate ID and Title will be imported normally
- The remaining test case(s) with the duplicate ID and Title cannot be imported.
There is an imported test case that already exists in a TestArchitect test module. Test Steps Only and Keep Folder Structure are selected. You choose “overwrite”.
- The step content of the TestArchitect will be overwritten with that of the TFS test case, no new corresponding test module will be created.
