Scripting an action in Python
Implement an action in Python, using the TestArchitect Python harness.
Before proceeding: Copy the files from the harness samples/python folder to a work folder of your own choosing. This is an important first step when creating user-scripted actions.
D:/harness/python) and copy to it the files from harness samples/python. From here on, all work will be performed on these files, and in this folder.You are going to implement an action named hello in thePythonharness. It will accept one argument, who, and write out the word hello, followed by the value specified for who:
As outlined in the three-step procedure described earlier, (in Developing your own User-scripted Python harness action), this entails making the following modifications to module mod_Example.py:
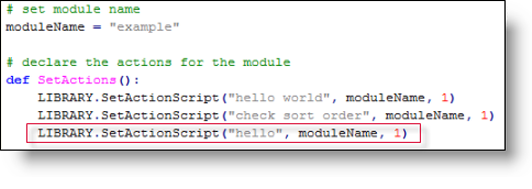
- adding a line to the list of
SetActions()function calls, declaring thehelloaction to have its implementation in theexamplemodule; - adding an
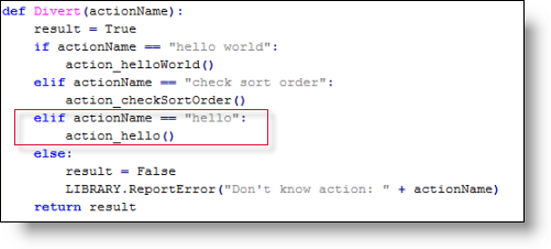
else-ifclause to theDivert()function, specifying the handling functionaction_hello()for thehelloaction; - Creating an implementation for the method
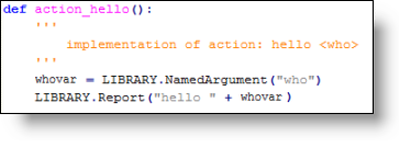
action_hello(). This method will do the actual work for thehelloaction.
These steps are implemented in the following procedure:
Open an editor or development environment for Python.
For example, use the Eclipse software development environment, with the PyDev plug-in.
- Notes:As discussed earlier, the new action definition will be added to the file
mod_Example.py.Open
mod_Example.pyin the editor. Add an additional SetActionScript() line to the SetActions() function of mod_Example.py, as shown:

This registers that the action
helloneeds to be interpreted by this module (or, more specifically, by the module with a moduleName of example)).Notes:SetActionScript() is a member function of an object called LIBRARY. This object represents the core interpreter library of TestArchitect, which has functions for common tasks like registering actions, getting arguments and reporting results of checks.
At this point, we’ve told TestArchitect which module will handle the hello action; now let’s tell it which specific function in the module it needs to call.
Add an else-if (
elif) clause to theif-statement in the module’sDivert()function:
You have now specified that the
helloaction is implemented by the Python functionaction_hello()- Notes:The real work, the implementation of the action itself, is performed by the
action_hello()function.Add this function to the end of your file with the following code:
 Notes:
If you prefer to use Python’s documentation conventions, you may want to place the comment below the definition header:

It is recommended that your comment specify that this is an action implementation, as depicted above.
Save your work.
You have now completed the implementation of a TestArchitect user-scripted action written in Python. The action hello, realized in the coding of Python function action_hello(), accepts a single argument, and writes that value to the TestArchitect output, using functions of TestArchitect’s Automation LIBRARY object.
action_helloWorld(), which implements the hello world action included in the example code. The principal difference is that, whereas the pre-existing action simply writes out the string hello world, your new one accepts an argument, one which replaces “world” as the recipient of the hello greeting. The difference in code is that a library function called NamedArgument() is now used to get the value of the who argument of the hello action. The code first assigns this to a variable named whovar, then uses it to create the text for the report. You may also have noticed the use of the Report() function of the LIBRARY object to write the string to the output. Report() is a wrapper that calls up TestArchitect’s implementation of the report action. Similarly, ReportError(), seen in the above step, calls up the implementation of TestArchitect’s report error action.Your scripted hello action is now ready to be run, but while the runtime system will have no problem recognizing it, the same is not yet true of the editor. You may want to take the interim, and optional, step of allowing the test editor to handle the new action gracefully.
Related concepts
