Exporting local test results to an HTML file
How to export your test results to an HTML file.
You have two options for exporting your test results to HTML:
Option #1: Manually exporting test results to HTML.
Select the local test results that you want to export to an HTML file.
ヒント:You can select local test results in the TestArchitect explorer tree, or on the local test result list view.Invoke the Save Result(s) To File dialog box by doing one of the following:
- Right-click the selection, and then click Export > to HTML file.
- Double-click the selection, and then click the Save to file
 icon on the main panel’s toolbar.
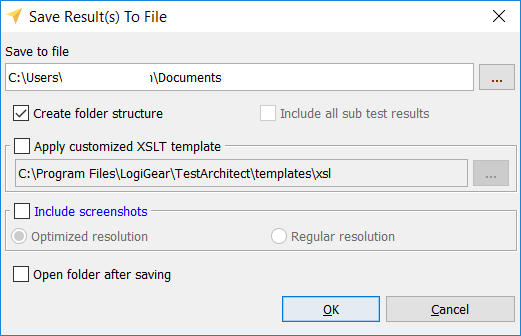
In the Save Result(s) To File dialog box, choose a location to which to save the HTML file.

You can accept the default location, but any place that is easy to remember will work.
Optional: If you’d like, TestArchitect creates subdirectories to store the exported HTML results, select the Create folder structure check box.
Specifically, two options are available as follows.
- Folder structure (the Create folder structure check box is enabled): TestArchitect creates a hierarchical tree structure, or subdirectories to store HTML results.
- Flat structure (the Create folder structure check box is cleared): TestArchitect does not create subdirectories. There is only a single top-level directory that contains all HTML results.
Optional: If the exported test result is a master result, that is, it is a test suite result or it contains subresults, the Include all sub test results check box is available. With this option chosen, the master result and its subresults are all exported into HTML files.
Optional: To export HTML results with your own view layout, select the Apply customized XSLT template check box, and then choose a location of your customized XSLT template.
You are first required to customize the default XSLT template, which means you need to modify a set of XSL files to suit your desired view layout. (See more examples here.)
Attention:When your customized XSLT is invalid, the default XSLT template, located at the following places, is automatically applied.- Windows: {TA_INSTALL_DIR}\templates\xsl\
- Linux: /usr/local/logigear/testarchitect/templates/xsl/
- macOS: /Applications/TestArchitect/templates/xsl/
注意:if you are using a repository on another machine, make sure that the template you choose is accessible to the repository server under the account that starts the repository server service. It means that the template needs placing either on the repository server or in a network shared folder. Otherwise, the default template will be used.Optional: To open the parent folder containing the exported test result, select the Open folder after saving check box.
Optional: To include all captured screenshots in the exported test result, select the
Include screenshotscheck box, then select one of the following:- Optimized resolution: The included screenshots’ dimensions are optimized to save space in the exported HTML test results. Specifically, the screenshots are saved as thumbnail images.
- Regular resolution: The original resolution of included screenshots is retained. The screenshots are saved as full size images.
Click Save.
The local test results are exported to an HTML file at the specified location.
Option #2: Directing TestArchitect to automatically export test results to HTML upon test completion.
In TestArchitect Client, select the test module(s) that you want to execute.
Click the Execute
 button on the toolbar.
The Execute Test dialog box appears.
Click the Advanced tab.
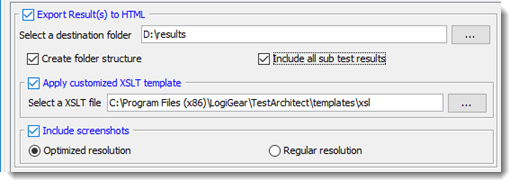
Select the Export Result(s) to HTML check box.
Click
 to choose a location to which to save the HTML file.
You can choose the default location, but any place that is easy to remember will work.
Optional: If you’d like, TestArchitect creates subdirectories to store the exported HTML results, select the Create folder structure check box.
Specifically, two options are available as follows.
- Folder structure (the Create folder structure check box is enabled): TestArchitect creates a hierarchical tree structure, or subdirectories to store HTML results.
- Flat structure (the Create folder structure check box is cleared): TestArchitect does not create subdirectories. There is only a single top-level directory that contains all HTML results.
Optional: If the exported test result is a master result, that is, it is a test suite result or it contains subresults, the Include all sub test results check box is available. With this option chosen, the master result and its subresults are all exported into HTML files.
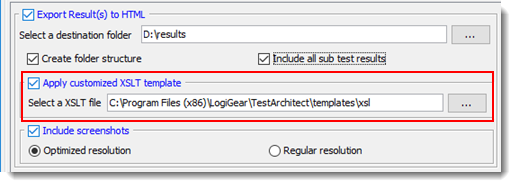
Optional: To export HTML results with your own view layout, select the Apply customized XSLT template check box, and then choose a location of your customized XSLT template.

You are first required to customize the default XSLT template, which means you need to modify a set of XSL files to suit your desired view layout. (See more examples here.)
Attention:When your customized XSLT is invalid, the default XSLT template, located at the following places, is automatically applied.- Windows: {TA_INSTALL_DIR}\templates\xsl\
- Linux: /usr/local/logigear/testarchitect/templates/xsl/
- macOS: /Applications/TestArchitect/templates/xsl/
注意:if you are using a repository on another machine, make sure that the template you choose is accessible to the repository server under the account that starts the repository server service. It means that the template needs placing either on the repository server or in a network shared folder. Otherwise, the default template will be used.Optional: To include all captured screenshots in the exported test result, select the Include screenshots check box. With this option chosen, select one of the following:
- Optimized resolution: Included screenshot’s dimensions are optimized to save space in the exported HTML test results. Specifically, the screenshots are saved as thumbnail images.
- Regular resolution: Original resolution of included screenshots is retained. Specifically, the screenshots are saved as full size images.
Click Execute.
TestArchitect saves the settings in the Advanced Setting tab and executes the test(s). Once execution is complete, the test results are automatically exported to an HTML file at the specified location.
注意:If you opt to generate a batch file (rather than execute the test immediately), the following parameters are written to the generated file. (Learn more).-html
Location and filename to which to store the test result report in HTML form.
-htmlscrn
Keeps captured screenshots when exporting test results to HTML.
-subhtml
Exports the master result and its subresults into HTML.
-xsl
Location to store the customized XSLT template
-subfld
Whether a flat structure directory or a folder structure directory is employed to store HTML results.
Related concepts
