Unlocking container classes
To capture child UI elements of a container class, that container class must first be unlocked.
Controls of TA classes Treeview, Listbox, Listview and Table are considered container class controls, due to their common characteristic of holding child controls. By default, during a window intake process, TestArchitect treats controls of a container class as locked. In order to access the child controls of a given container control, you must first unlock its class.
- Windows Presentation Foundation (WPF)
- Win32
- Silverlight
- Windows Forms (WinForms)
- SAP
Create a new interface entity in TestArchitect, and keep it open.
Open the application of interest and navigate to the window whose interface you want to capture, and which has at least one container class control whose children you need to access.
Launch the Interface Viewer and click the Identify button on the viewer’s toolbar.
注意:As a shortcut, you can bypass the Interface Viewer and launch into Identify mode by clicking the Identify button on TestArchitect’s toolbar. (Note, though, that this example is based on proceeding via the viewer.)
Hover the mouse cursor over the container class control to be accessed.
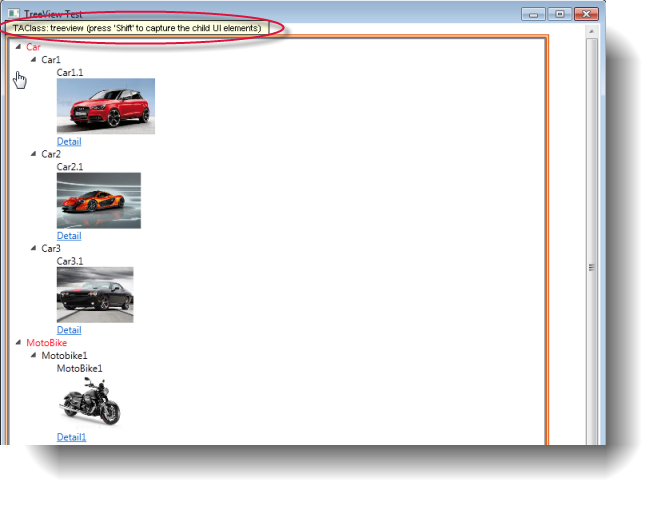
注意:You may observe that, at this point, only the container control can be highlighted, no matter which child controls you hover the cursor over. That will change once you unlock the container’s class.As an illustration, the figure below displays an application window with a tree view, and the cursor hovering over it while in Identify mode.
A displayed screentip indicates that the container class can be unlocked by pressing Shift on your keyboard.

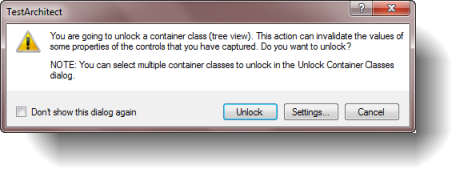
Shift.A warning dialog box appears, asking you to confirm that you wish to unlock the specified container class.

The warning refers primarily to the fact that global pos values of other controls in the window may be affected by this action. Under some circumstances, anchor pos values can be altered as well. If your interface definitions for the associated window do not depend on these two properties for identifying controls, you need not be concerned about this.
- Select the Don’t show this dialog again check box to skip this dialog box in the future.
- If you want take this opportunity to unlock additional container classes within the window, click the Settings button (see The container class settings, Option #1).
Click the Unlock button.
The selected container class is now unlocked, freeing you to capture the descendant UI elements of your choice from the selected control.
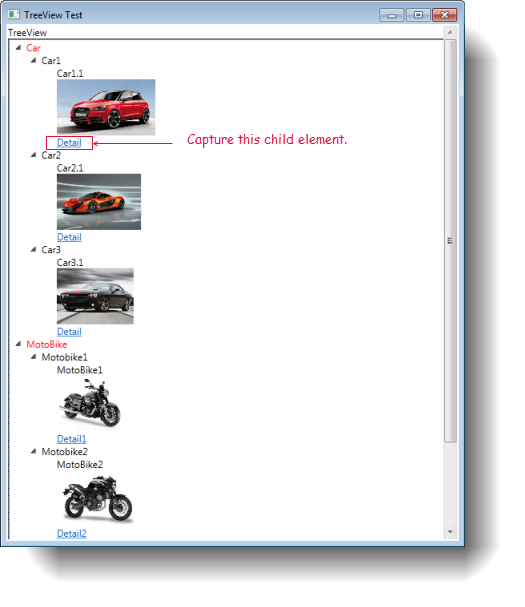
ヒント:You are also free to capture the descendants of any other controls of this class that may exist in the window, as it is the selected control’s class, not the control itself, that has been unlocked.Capture a desired child UI element by clicking it.
As an example, we select the Detail text control residing under the Car1.1 node.

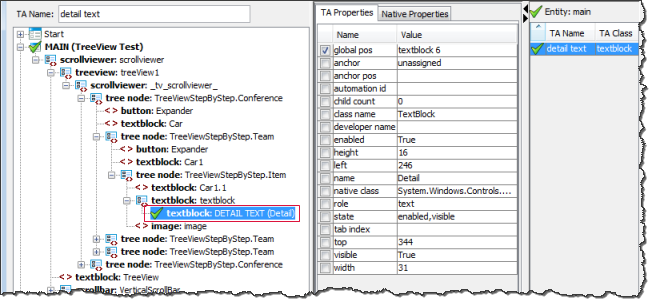
The node representing the selected child UI element is highlighted in the Interface Viewer’s UI explorer panel.
注意:If you entered Identify mode via the TestArchitect interface, you will observe this node and its parent hierarchy not in the Interface Viewer, but in the Element definition dialog box.Change the default name in the TA Name field to one that is more user-friendly, then press Enter.
We’ll name our control Detail text.
注意:The following result assumes you are using the Interface Viewer.The name you have assigned to the control appears in the node in uppercase letters. At the same time, the name of your open interface entity is assigned to the top-level node representing the window, with the native window title in parentheses. Green check marks
 indicate that both the control and window are now provisionally mapped to the interface entity, awaiting your Save command to make the mappings permanent.
Click the Save
 button on the toolbar.
Your mappings are now permanently saved to the open interface entity.
Close the Interface Viewer (or Element definition dialog box).
The open interface entity is now populated with an interface entity setting line which maps it to a window, and an interface element line which maps the control you selected. The interface entity has also been saved.
Proceed to the next section to learn how to interact with controls dynamically.
Related concepts
Related tasks
Mapping unknown controls to a new class
Remapping known controls to a new TA class
