Test editor basics
The TestArchitect test editor is used to create and modify action-based tests.
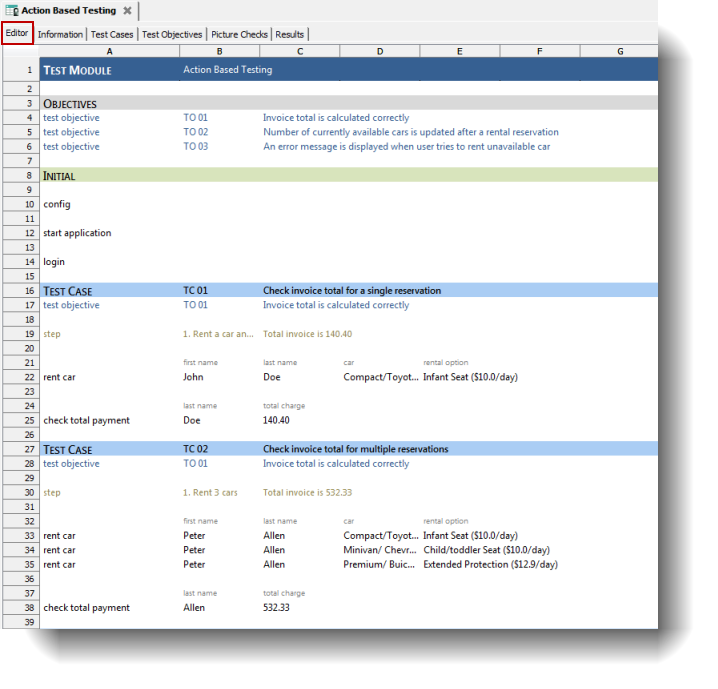
When you click the Editor subtab of a test module, action definition, interface entity, or data set, you see the worksheet-based TestArchitect test editor. It is here that you create and modify your action-based tests.
The test editor typically looks something like this:
Navigation
The editor is designed to facilitate the creation of action-based tests, though in many ways it behaves comparably to other spreadsheet applications, such as Microsoft Excel™. You can move the cell pointer with the standard keyboard commands as follows:
| Key | Description |
|---|---|
| Arrow keys | Move the cell pointer up, down, left and right. |
| Tab | Advance the cell pointer to the next cell in the column on the right. |
| Shift+Tab | Move the cell pointer left to the previous cell. |
| Page Up | Move the cell pointer up one page. |
| Page Down | Move the cell pointer down one page. |
| Ctrl+Page Up | Move the cell pointer left one page. |
| Ctrl+Page Up | Go to the previous item tab. |
| Ctrl+Page Down | Move the cell pointer right one page. |
| Ctrl+Page Down | Go to the next item tab. |
| Home | Move the cell pointer to the cell in column A of the current row. |
| End | Move the cell pointer to the last cell that has data of the current row. |
| Ctrl+Home | Move the cell pointer to the first row. |
| Ctrl+Home | Move the cell pointer to the upper left of the worksheet. |
| Ctrl+End | Move the cell pointer to the bottom of the editor (three rows below the last line) to continue adding action lines. |
| Ctrl+End | Move the cell pointer to the lower right of the worksheet. |
| Enter | Enter or edit action lines. 注意: The Enter key uses intelligent navigation to anticipate the next cell you intend to edit. |
| Shift+Enter | Move the cell pointer up to the previous cell. |
Editing cell content
Once you navigate to a cell, you can begin typing into it.
To modify, rather than replace existing cell content, double-click the cell. That puts you into cell-edit mode. Alternatively, if the cell is already selected, you can enter cell-edit mode by hitting the F2 key. Once in cell-edit mode, you may use the Left and Right Arrow keys to navigate through the cell text, or use the mouse to place the text cursor where desired.
Entering action lines
When you begin typing an action keyword into column A, TestArchitect uses autocomplete to create a drop-down list of possible actions whose names match the letters you have typed. Use the Up and Down arrow keys to navigate through the list. Additionally, as each action in the list is highlighted, a screentip appears, presenting both a description of the action and descriptions of the arguments it accepts.
Press Enter to complete your selection of an action.
Once you have entered or selected an action, the test editor automatically populates the argument names in the row above, as shown in the image below for the enter action.
Line continuation
Sometimes your action lines can be long, expanding past the edge of the editor window. Functionally, there is nothing wrong with that, but if you want to make your test procedures more easily readable, you can break an action line into two or more lines with the help of the line continuation symbol, >>>. The symbol must be placed in column A of each added line of the action. Be careful to place it at the level of the argument values, not the headers:
Entering argument values
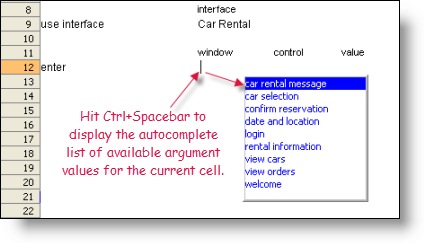
For arguments of actions related to an interface entity or element, when the cell pointer is on a cell and you press Ctrl+Spacebar, a context-based list of available values appears. Select a value using the Up or Down arrow keys and press Enter.
Intelligent navigation
You may have noticed that the first time you pressed the Enter key, the cell pointer moved one cell to the right. After typing into the last argument cell and pressing Enter, the cell pointer repositions itself to column A of the line three rows down. This is part of TestArchitect’s intelligent navigation.
With intelligent navigation, TestArchitect anticipates what your next entry will be, and moves the cell pointer to that cell. Most actions take a set number of arguments that are entered into cells immediately to the right of the action’s name. The editor, like the automation, is aware of how many arguments a given action takes. As you enter each argument value, pressing Enter causes the editor to move the cell pointer to the next argument cell. Once all the argument fields are filled, the cell pointer moves to a new row (three rows below the current line) in preparation for the entry of a new action line. Additionally, if there are any action lines below the current line (not more than five rows below), pressing Enter moves the cell pointer from the current action line to the next existing action line to facilitate editing.
Saving
When content in the editor is changed, a star ( * ) appears next to the item’s name in the tab, as shown below in the *Action Based Testing tab. This is an indication that the editor’s copy of the file contains unsaved changes.
You can save the currently opened file in the active editor in several ways:
- From the main menu, select File > Save File.
- Click the Save File button on the toolbar.
- Press the combined keys
Ctrl+S.
Alternatively, you can save all opened files in the editor two ways:
- From the main menu, select File > Save All
- Click the Save All button on the toolbar.
Ambiguous entities: TestArchitect checks for ambiguous entities (described in Ambiguous entities) before saving the files. If there are ambiguous entities that need mapping, a Select Interface dialog box appears for you to specify which ambiguous entity to map to which interface.
Commenting
Comments may be added to test modules, actions, interface entities and data sets. A commented line starts with two forward slashes (//); its contents are ignored during test execution.
A comment must occupy its own row in the editor, and be entered into column A. Entering a comment to the right of an action line is not supported, and can lead to unpredictable behavior.
Comments can be used to explain a step in a test, as shown here:
Commenting is also used to temporarily turn off an action line:
The comment indicator can be entered or removed by hand, but the editor also provides some functions to perform this automatically for a selected set of editor lines, a selected test case (of a test module),or all lines in the editor.
- To comment a set of lines, select them, then press
F8. - To uncomment the lines, select them, then press
Shift-F8. - To comment all lines in a test case, right-click the TEST CASE row and select Comment Test Case.
- To uncomment all lines in a test case, right-click the TEST CASE row and select Uncomment Test Case.
- To comment all lines in a test module, action or data set,right-click in the editor and select Comment All Test Lines.
Reformatting the test editor
The TestArchitect test editor does a bit of context-based formatting as you type. On occasion, however, it can miss items. This may happen, for example, when another user creates or deletes an action that you are referencing, with the result that the editor may not adjust the font color as expected (black for known actions, red for nonexistent actions). However, you can force the editor to access the repository for the latest status of actions, and then to update all formatting accordingly, by using the Reformat command:
- Right-click to open the test editor context menu.
- Select Editor > Reformat.
Automatic matching of paired actions
The TestArchitect test editor provides for the automatic insertion of closing actions for paired built-in actions as follows:
- if/end if
- while/end while
- create data set/end create data set
- if control exists/end if
- if control not exists/end if
- if window exists/end if
- if window not exists/end if
- repeat/until
- use data set/repeat for data set
For example, when you type if into a test, and then hit Tab or Enter, the end if action is automatically inserted several lines below the if action.
Adjusting the row height or column width
The height of rows and the width of columns may be adjusted by dragging the separator line between row and column headers. To resize row height or column width to automatically fit the existing text, double-click the separator line.To set the row height or the column width back to its default value, double-click the separator line.
Inserting empty lines
Ctrl + I: Insert a single new line into the editor worksheet, at the current location of the cell pointer.Ctrl + Enter: Insert several empty lines into the editor worksheet, below the current location of the cell pointer, and move the cell pointer three lines down to allow you to continue adding action lines.注意:By default, TestArchitect automatically inserts four empty lines. You can set the number of inserted empty lines in the Preferences dialog box.
Related concepts
Working with TestArchitect Client
