Creating a test tool profile
In order to run your test automation with a customized harness program, a test tool profile for that harness must be created.The profile specifies the executable file (or the combination of executable and script) that implements the harness tool, along with the options that are automatically passed to the tool on execution. It further identifies which options a user may set for a given test run.
Creating your own test playback tool to allow scripts to be written in a language of your choice requires that you develop your own harness for that language. The harness tutorial lessons provide some insight into creating a harness. If you already have TestArchitect installed, you can refer to the source code for the actual Java and Python harnesses, located at {INSTALL_DIR}\harness samples\java\source and {INSTALL_DIR}\harness samples\python, respectively.
To configure your custom harness test tool, do the following:
Log in to a TestArchitect repository as a member of the administrator group.
In the TestArchitect explorer tree, expand the Administration > Tool Profiles > Test Tool node.
Right click the Test Tool node, and select New Test Tool.
The New Test Tool dialog box appears:
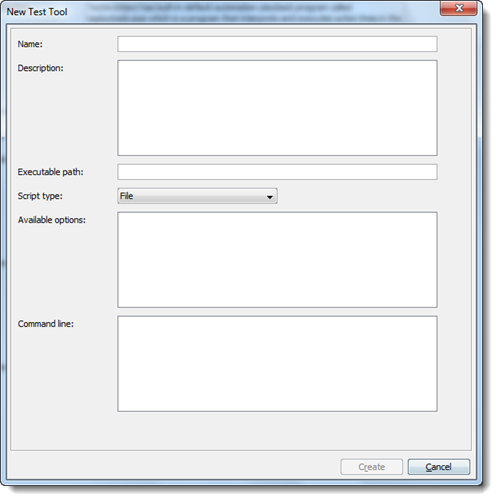
In the dialog box, enter the details for the tool you are adding:
Name: Your name for the test tool.
Description: Short description of the tool.
Executable path: Path of the executable program (for example, {INSTALL_DIR}\jre\bin\java.exe) that, possibly in combination with a script, implements your harness.
注意:The harness may be implemented as a single executable file (as is the case with the sample C# harness), or as an interpreted script file. An example of the latter is the sample Python harness, implemented as the script file ta_main.py, which is executed by the Python interpreter.注意:The specified executable program appears in the Executable(s) field of the Automation Tools dialog box, which you can access during test run setup from the Execute Test dialog box.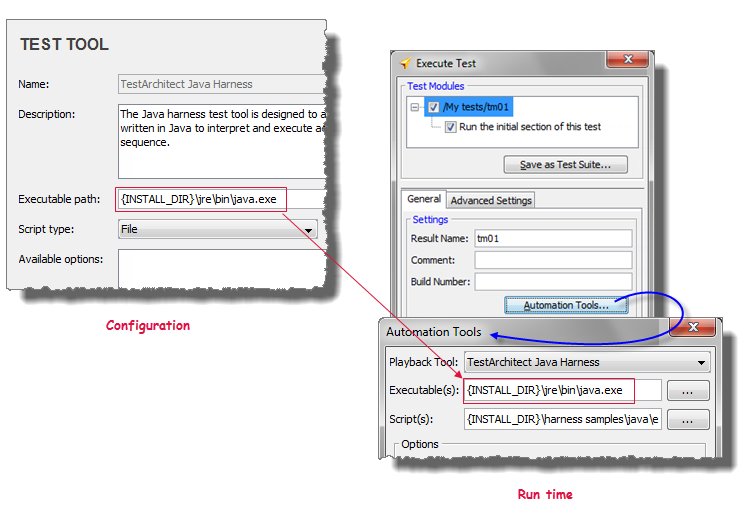
Script type: Type of script to be executed. Possible values are:
- File
- Folder
- Database
- Other
注意:Unless you are an advanced user or have the assistance of TestArchitect support, your choice should simply be File.Available options: Here, you list those “yes/no” options that the user of the tool may specify at test run setup time, and which will be passed to the specified harness as command line arguments.
The arguments will appear to the tool user as check box options in the Options panel of the Automation Tools dialog box.
Syntax for specifying how each check box option is to appear on the command line, based on the user’s selected options:
"[Option_name]"/"[Value_if_checked]"/"[Value_if_cleared]"/[Default_value]ヒント:To add multiple options, separate them by commas.Each component of the above option specification is described below:
Component Description Option_name Label for the check box option. At run setup time, this check box is displayed in the Options panel of the Automation Tools dialog box. 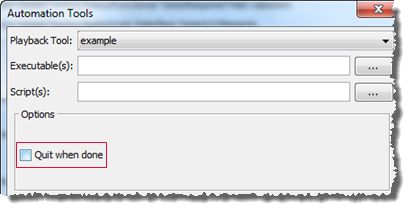 注意:Note that the value of Option_name is also used to name a variable representing the given option in the Test Tool Command line field, as described below.
Value_if_checked The value written to the command line if this option is selected. (Visible in the Command Line field of the Automation Tools dialog box.) Value_if_cleared The value written to the command line if this option is cleared. (Visible in the Command Line field of the Automation Tools dialog box.) Default_value Can be true or false. If true, this option’s check box is selected when the Automation Tools dialog box is first opened; if false, it is cleared. Example: The following options are entered into the Available options field:
"Quit when done"/""/"-don't_quit"/true, "Tracing"/""/"-animate"/false, "Run minimized"/"-run_minimized"/""/true, "Batch mode"/"on"/"off"/falseThis string effectively sets the following values:
Option_name Value_if_checked Value_if_cleared Default_value Quit when done (empty string) -don’t_quit true Tracing (empty string) -animate false Run minimized -run_minimized (empty string) true Batch mode on off false and results in four check boxes being displayed in the Options panel of the Automation Tools dialog box during test run setup, two of which are pre-selected:

Command line: This is actually a template that you create for the command line options string that is passed to the harness. It consists of both soft- and hard-coded elements.
The soft-coded components are enclosed in curly braces {} and are essentially variables whose values are determined by the user at run setup time.
Hard-coded components are those outside of curly braces, and are passed along to the final command line string unchanged.
The ultimate command line options string that is sent to the executable is determined by the choices that the user makes in the Automation Tools window. It can be seen at the bottom of that window.
Some rules that apply in constructing the command line template:
{SCRIPT}: A reserved variable name which is replaced at test run setup by the contents of the Automation Tools window’s Script(s) field:
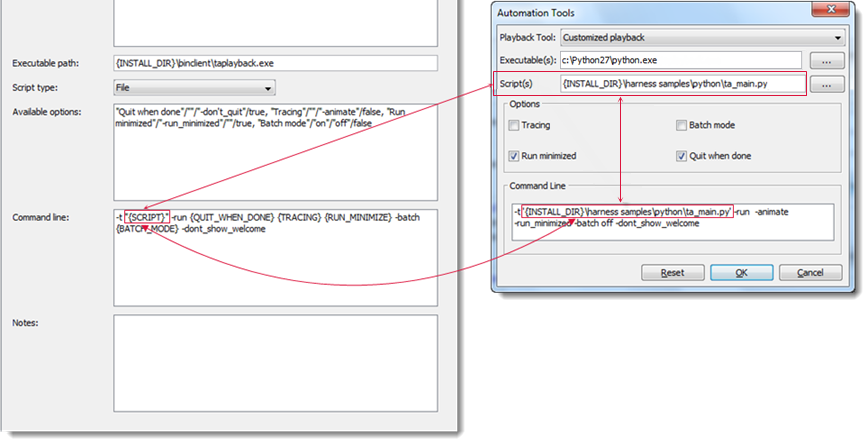
For each option listed in the Available options field, enter the Option_name value at that place in the command string where you would like it to appear, taking care to do the following:
- convert all letters to uppercase
- replace all spaces with underscores
- enclose the name in curly braces
Hence, for example, the option Quit when done should appear as {QUIT_WHEN_DONE} in the command string template. (Note that, in the final command string that is executed, this value is replaced with either an empty string, or with
-don't quit, depending on the state of the corresponding check box in the Automation Tools window.)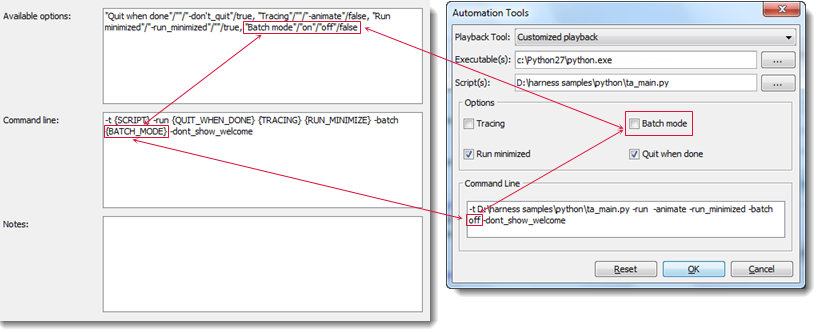
Example: The following template is entered into the Command line field:
-t {SCRIPT} -run {QUIT_WHEN_DONE} {TRACING} {RUN_MINIMIZED} -batch {BATCH_MODE} -dont_show_welcomeVariables in the final command line string are replaced as follows:
Command line template variable Replacement value (general case) Replacement value for above Automation Tools settings {SCRIPT} Replaced by the value specified in Automation Tools>Script(s) field. D:\harness samples\python\ta_main.py{QUIT_WHEN_DONE} Replaced by empty string when Automation Tools>Quit when done check box is selected; otherwise replaced by -don't quit.(empty string) {TRACING} Replaced by empty string when Automation Tools>Tracing check box is selected; otherwise replaced by -animate.-animate{RUN_MINIMIZE} Replaced by -run_minimizedwhen Automation Tools>Run minimized check box is selected; otherwise replaced by empty string.-run_minimized{BATCH_MODE} Replaced by onwhen Automation Tools>Batch mode check box is selected; otherwise replaced byoff.offAssuming that {INSTALL_DIR} evaluates to
D:\Program Files\LogiGear\TestArchitect, the ultimate command string that is formed, including the executable, is:C:\Python27\python.exe -t D:\harness samples\python\ta_main.py -run -animate -run_minimized -batch off -dont_show_welcome
Click Create.
A new test tool is created and added as a child node beneath the Test Tool node.
