Capturing screenshots during test execution
With screenshot recording active,TestArchitect captures screenshots during test execution for each UI-interactive action. Depending on your settings, it retains some of these screenshots and logs them to the generated test result.
To capture screenshots during test automation, carry out the following steps:
Launch the Execute Test dialog box.
Under the General tab, select the Screenshot recording check box.

In the Keep picture set for each section, specify which types of test outcome events the associated screenshots are to be retained for. The possible screenshot-logging events are:
- Passed: passed checks
- Failed: failed checks
- Warning/Error: automation warnings and errors
In the Keep box, specify the number of UI-interacting actions preceding each screenshot-logging event whose screenshot sets are to be logged to the results. (With screenshot recording enabled, the minimum is 1. By default, three screenshots sets are retained.)
Notes:- If this field is left empty, TestArchitect captures and logs screenshots of all UI-interacting actions.
- Only integer values above 0 are accepted.
Click the Execute button to run the automated test.
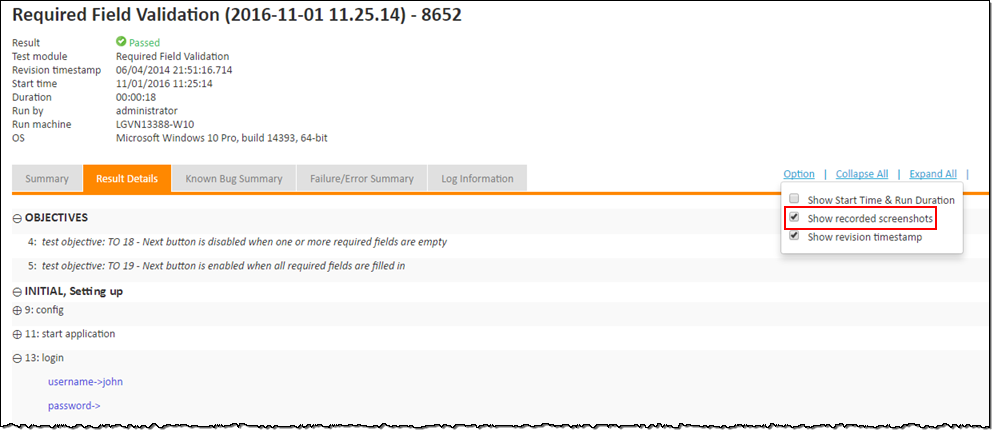
During test execution, TestArchitect captures screenshots in accordance with its rules, then, based on your settings in the Screenshot recording panel, logs the qualified screenshots to the generated local test result. Screenshots may be viewed in the Result Details tab once you’ve enabled their display:
- On the web browser, click on the Result Details tab.
- Click the Option drop-down button, and ensure that Show recorded screenshots is enabled.

- If you choose to generate a batch file (see Executing tests from the command line interface) for test automation, two parameters provide the specifications for screen recording: -capturecond specifies the screenshot-logging events, while -capturelimit indicates the number of screenshot sets to be logged per event:
- Android: This feature, when applied to a connected Android device, requires that the TestArchitect Agent service be running. Note also that, if and when an Android device is restarted, TestArchitect Agent is then stopped. Should this be the case, it is essential that you reactivate the service by observing the following steps:
- Connect the Android device to the test controller through a USB cable (not Wi-Fi), if not already so connected.
- Open the Android Instrumentation Tool dialog box.
- Click the Refresh devices list
 button.
Related concepts
Related tasks
Exporting local test results to an HTML file
