Manually uploading TestArchitect test results to Zephyr
TestArchitect test results from projects or test cases which are mapped to Zephyr can be uploaded to Zephyr by manual means as well as automatic.
- 6.2
- Zephyr Cloud
- TestArchitect 8.4 Update 4 & 5
Ensure that you have already taken the following steps:
Mapped the TestArchitect project containing the test cases of interest to a Zephyr project.
In Zephyr, added the tests to a test cycle and assigned them to a user.
Note:Test cycles, and the test phases which comprise them, are Zephyr entities and are beyond the scope of this help system. Further information on them is available at https://zephyrdocs.atlassian.net/wiki/spaces/ZE61/pages/263554868/Test+Planning.
- In TestArchitect 8.4 Update 1 or earlier versions, if you have selected the Create New option while adding a new testing phase to a testing cycle in Test Planning in Zephyr, you will be unable to upload TestArchitect test results to Zephyr either manually or automatically (Learn more).
To manually upload TestArchitect test results to Zephyr:
In the TestArchitect explorer tree or a result list view, right-click the preferred test result or test result folder, and then select External Tool > Zephyr > Upload to Zephyr.
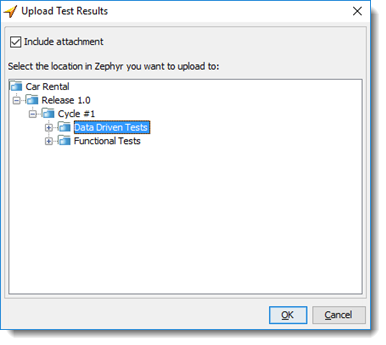
In the Select Test Case To Upload dialog box,

Select the destination in Zephyr where you want to upload the TestArchitect test result(s).
Deselect the Include attachment checkbox if you do not want to upload the details of the test result(s) as attachment(s) to Zephyr, but only update the execution status of the test case(s) and its/their individual test steps.
Click OK
Upon successful completion of the upload, a confirmation dialog box is displayed:

Click OK to close the confirmation dialog box.
TestArchitect test results are uploaded to Zephyr in ZIP format.
To view the uploaded results on Zephyr, see the next topic.