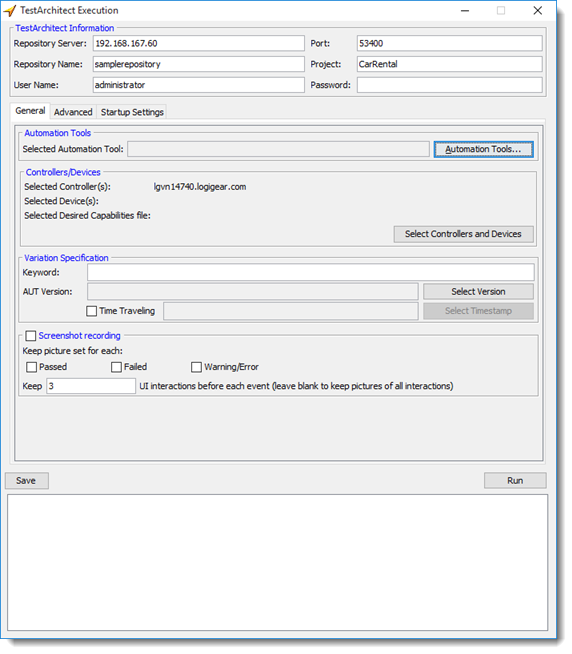
TestArchitect Execution dialog box
The TestArchitect Execution dialog box is invoked, when TestArchitect automated runs are executed via MTM.
TestArchitect Execution dialog box
In order to invoke this dialog box, see here.
TestArchitect Information panel:

- Repository Server: Name or IP address of TestArchitect Repository Server holding the repository of the tests.
- Port: Port number of the TestArchitect Repository Server host.
- Repository Name: Name of TestArchitect repository hosting the tests.
- User Name: TestArchitect user name whose account has permission to access and execute tests on the host.
- Password: Password for the above user account.
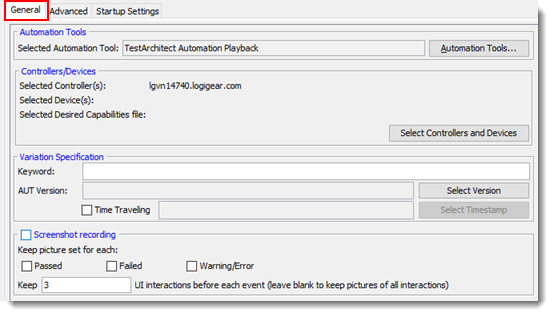
General tab:

- Screenshot recording: Select this check box to configure the capturing of screenshots of UI-Interacting actions. (Learn more.)

- Screenshot recording: Select this check box to configure the capturing of screenshots of UI-Interacting actions. (Learn more.)
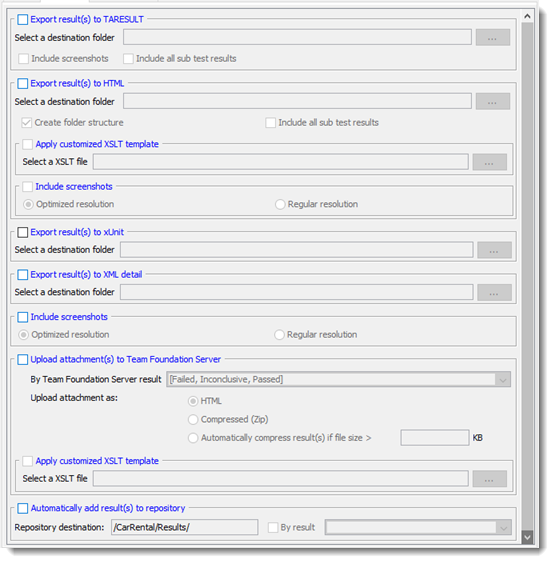
Advanced tab:

Export Result(s) to TARESULT: Select this check box to export TA results as .TARESULT files.
Note:.TARESULT is an archive extension, developed by LogiGear.
- Include screenshots: Include all captured screenshots in the exported test result.
- Include all sub test results: If the exported test result is a master result, meaning it is a test suite result, or it contains subresults, the Include all sub test results check box is available. With this option chosen, the master result and its subresults are all exported into .TARESULT format.
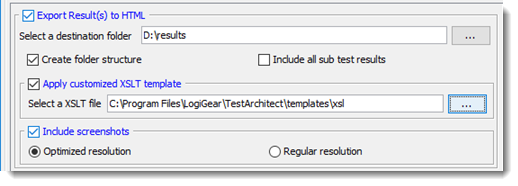
Export Result(s) to HTML: Export test results to HTML file automatically once the text execution is complete (learn more).

- Create folder structure: Select whether the folder structure or flat structure directory is created to store HTML results.
- Folder structure (the Create folder structure check box is enabled): TestArchitect creates a hierarchical tree structure, or subdirectories to store HTML results.
- Flat structure (the Create folder structure check box is cleared): TestArchitect does not create subdirectories. There is only a single top-level directory that contains all HTML results.
- Include all sub test results: If the exported test result is a master result, that is, it is a test suite result or it contains subresults, the Include all sub test results check box is available. With this option chosen, the master result and its subresults are all exported into HTML files.
- Apply customized XSLT template: Export HTML results with your own view layout.
- Include screenshots: Retain all captured screenshots in the exported HTML test result.
- Optimized resolution: Included screenshot’s dimensions are optimized to save space in the exported HTML test results. Specifically, the screenshots are saved as thumbnail images.
- Regular resolution: Original resolution of included screenshots is retained. Specifically, the screenshots are saved as full size images.
- Create folder structure: Select whether the folder structure or flat structure directory is created to store HTML results.
Export result(s) to xUnit: Export test results to a XML file automatically in xUnit-format for integrating into the continuous integration tools once the text execution is complete.

Export result(s) to XML detail: Export test results to XML file automatically once the text execution is complete (see Exporting test results to XML for more details).

Include screenshots: Select this check box if you want to retain all captured screenshots in the test results attached to TFS.

- Optimized resolution: Included screenshot’s dimensions are optimized to save space in the exported HTML test results. Specifically, the screenshots are saved as thumbnail images.
- Regular resolution: Original resolution of included screenshots is retained. Specifically, the screenshots are saved as full size images.
Upload attachment(s) to Team Foundation Server: Select this check box to upload the TA test result to selected TFS test cases as an HTML file attachment. (Selectivity is determined by the field that follows).

The By Team Foundation Server result list box allows you to specify which associated TFS test cases are to receive links to the attached test result. This determination is based, for each given test case, on its result in terms of its TFS outcome.
Passed: Attach the TA test result file if the test case’s TFS outcome is Passed.
Inconclusive: Attach the TA test result file if the test case’s TFS outcome is Inconclusive.
Failed: Attach the TA test result file if the test case’s TFS outcome is Failed.
Note:The mappings between TestArchitect result statuses and TFS outcomes (that is, how TFS interprets each TA result status) are defined during initial configuration of the TA repository’s connection to the Team Foundation Server. (Learn more.)
If more than one condition is selected, they are effectively OR’d together. For example: If both Passed and Failed check boxes are selected, any TA result that has an TFS outcome of either Passed or Failed is uploaded as an attachment.
In the Upload attachment as panel, select the format of the uploaded test result.
- HTML: (Default) Upload the result as an HTML file.
- Compressed (Zip): Upload the result as a zipped HTML file.
- Automatically compress result(s) if file size > KB: Upload the result as a compressed (zipped) HTML file if the file exceeds the specified size. Otherwise, upload the result as an uncompressed HTML file.
Apply customized XSLT template: Export HTML results with your own view layout.
Note:- You are first required to customize the default XSLT template, which means you need to modify a set of XSL files to suit your desired view layout. (See more examples here.)
- When your customized XSLT is invalid, the default XSLT template, located at the {TA_INSTALL_DIR}\templates\xsl\ directory, is automatically applied.
Important:Please ensure that your Repository Server has access rights to the location which stores the XSLT template.