Automating actions
An action which can be automated belongs to one of three categories: built-in, user-defined or user-scripted.
There are three ways in which an action can be automated:
An action may be built-in: TestArchitect’s automation libraries support these actions for most of the common platforms. These built-in actions are also considered system-level actions.
A new action may be created and built-up from existing actions in an action definition. Such an action is known as a user-defined action.
Note:A user-defined action definition can be comprised of other user-defined actions, built-in actions, user-scripted actions, or any mixture of the above.Additional actions can be implemented using a scripting or programming language, in a harness (see Lesson #8: Using an automation harness). These are known as user-scripted actions..
Action Definition
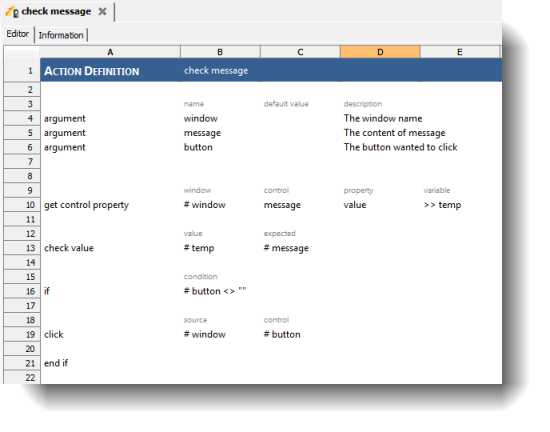
An action definition is created in a worksheet in the test editor, same as for a test module. The main difference is in its use of arguments. See the example below of the check message action, which performs three main functions:
- Check whether a message window exists.
- Check the contents of the message window against an expected value.
- Click a button to close the message dialog box.
There are three arguments:
- window: TA name of the message window.
- message: Expected text of the message.
- button: Button to click.
The definition consists of three action lines (with get control property, check value and click) that detail what needs to happen if the check message is used in a test. The argument values, coming from the calling action line, are used in the three action lines by preceding the argument names with a pound key (#).
- In TestArchitect the pound key indicates an expression, in which the argument name plays the role of a variable. Since the arguments of the check message action are used as variables in the expressions, you can apply operators. For example if all messages in the tested application end with exclamation points (!), you could replace the cell C13 with:
# message & "``!" - If you type a nonexistent action into the worksheet, the system automatically highlights it in red to identify the error. To add such a highlighted action to your project:
Right-click the action name.
Select Create Action from the context menu.
Fastpath: Ctrl + Alt + C
Fill in Description and Argument.
Click Create.
Once the action has been created, the action line in the worksheet will appear with normal formatting, indicating that the action now exists in the system.