Scripting an action in Java
Implement an action in Java, using the TestArchitect Java harness.
Before proceeding: Copy the files from the harness samples/java folder to a work folder of your own choosing. This is an important first step when creating user-scripted actions.
You are going to implement an action named hello in theJavaharness. It will accept one argument, who, and write out the word hello, followed by the value specified for who:
As outlined in the three-step procedure described earlier, (inDeveloping your own User-scripted Java harness action) ), this entails making the following modifications to moduleMod_Example.java:
- adding a line to the list of SetActions() function calls, declaring the hello action to have its implementation in the example module;
- adding an
else-ifclause to the Divert() function, specifying the handling function action_hello() for the hello action; - Creating an implementation for the method action_hello(). This method will do the actual work for the hello action.
These steps are implemented in the following procedure:
Open your Eclipse development environment.
Import the entire Java harness project (we’ll assume it is in D:/harness/java) into your Eclipse workspace.
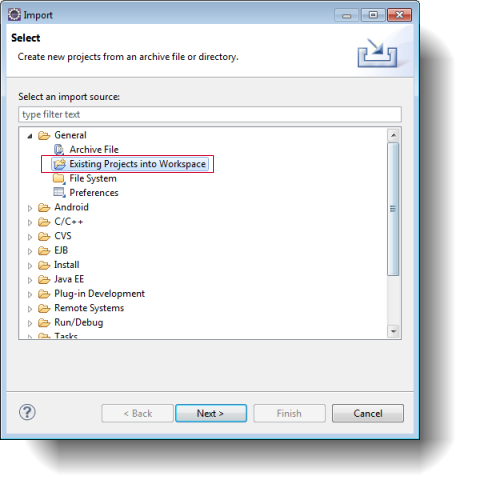
From the main menu bar, select File > Import.
The Import wizard opens.
Select General > Existing Projects into Workspace, and click Next.

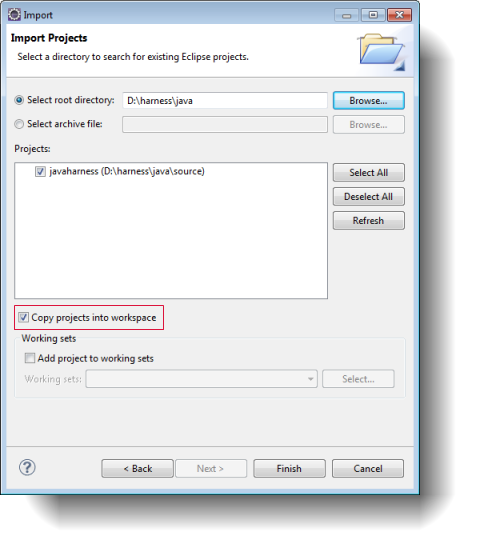
Choose Select root directory and click the associated Browse to locate the directory (D:/harness/java) containing the Java harness project.
Select the Copy projects into workspace check box to copy the Java harness project you are importing to your Eclipse workspace.

Click Finish to start the import.
Your project is now imported
As discussed earlier, we must add the new action definition to the file Mod_Example.java.
If not already available, open the Package Explorer view by selecting Window > Show View > Package Explorer
In the Package Explorer view, double-click the Mod_Example.java node under javaharness > src > com.testarchitect.java.user
Mod_Example.java opens in the editor.
In the editor, add an additional setActionScript() line to the setActions() method of Mod_Example.java, as shown (in bold):
/**
 * Example Module
 *
 */
public class Mod_Example {

	/**
	 * declare the actions for the module
	 */
	public static void setActions() {
		String module = "example";

		AbtLibrary.setActionScript("hello world", module, 1);
		AbtLibrary.setActionScript("hello", module, 1);
	}
  ...
This registers that the action hello needs to be interpreted by this class, example.
Note:setActionScript() is a member function of an object called AbtLIBRARY. This object represents the core interpreter library of TestArchitect, which has functions for common tasks like registering actions, retrieving arguments and reporting results of checks.Next, add an else-if clause (in bold) to the
ifblock in the class’ divert() method:/** * map an action to its function * * @param actionName * @return */ public static boolean divert(String actionName) { boolean result = true; if (actionName.equals("hello world")) { action_helloWorld(); } else if (actionName.equals("hello")) { action_hello(); } else { result = false; AbtLibrary.reportError("Don't know action {" + actionName + "}"); } return result; }This specifies that the hello action is implemented by the Java method action_hello().
If your IDE presents a message that the method action_hello() is undefined, that’s OK: you’re about to define it.
Add action_hello() to the end of your file with code that looks like this:
	/**
	 * "hello" action implementation
	 */
	public static void action_hello() {
		String whovar = AbtLibrary.NamedArgument("who");
		AbtLibrary.report("hello " + whovar);
	}
Save your work.
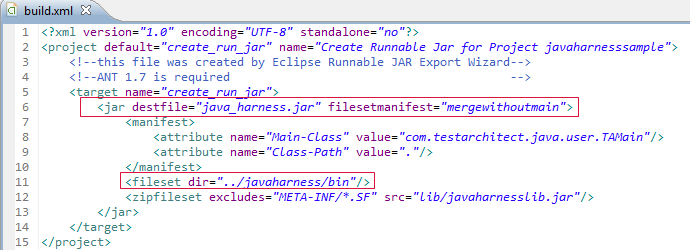
Open build.xml in the editor: In Package Explorer, double-click the build.xml node under javaharness.
Modify the setting of the destfile attribute to specify the filepath of the JAR, java_harness.jar, that is to be built. (We’ll specify only the file name, so that it will be generated at the same level as build.xml.)
Modify the setting of the dir attribute to specify the root of the directory tree of the bin file set,where the compiled java class files will be stored.

Set the compiler setting for your Java project to 1.8:
In Package Explorer, right-click your Java project, then select Properties.
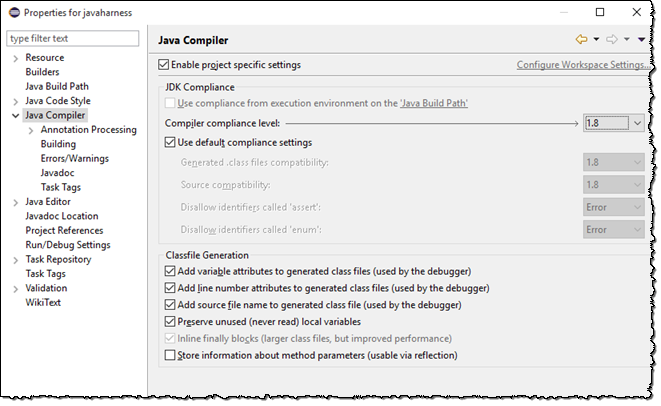
In the left-hand panel of the Properties for <project name> dialog box, select Java Compiler.
In the Java Compiler panel, select the Enable project specific settings check box.
Select 1.8 as the desired compiler compliance level.

Click OK to apply the setting and close the Properties for <project name> dialog box.
In Package Explorer, right-click the file build.xml and choose Run As > Ant Build to build an executable JAR file, java_harness.jar.
The java_harness.jar file is created at the specified location within your Eclipse workspace.
You have now completed the implementation of a TestArchitect user-scripted action, written in Java. The action hello, realized in the coding of Java method action_hello(), accepts a single argument, and writes that value to the TestArchitect output, using functions of TestArchitect’s Automation AbtLIBRARY object.
You are now ready to execute your test and verify that your user-scripted action works correctly.