Encapsulating action lines
In this exercise you will refactor your last test case by encapsulating its report action line into a user-defined action .
In the
My streamliningtest module you created previously, create a new test case:Place your cell pointer on a line somewhere below the existing set of action lines (but before the
FINALsection, if any).Click Create New Test Case
 on the toolbar.
A test case line similar to the following is inserted.

In the second column of the new line, assign the test case an ID of
TC 03(if not already set to that value).Press
Tabto advance to the next column, and provide a description for your test case, such asSame-location car rental.
We choose this test case name because its purpose is to initiate an order for a rental car, one which is to be picked up and returned to the same location
Add enough space to the test case (you can use
Ctrl+ito insert rows) to allow for the following set of action lines to be entered, and then enter them: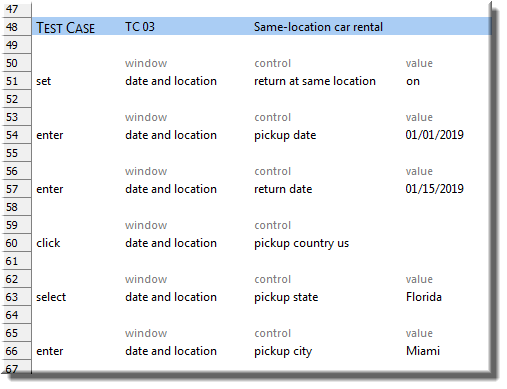
If you have not already done so, start the Car Rental application by selecting Start > All Programs > TestArchitect > Samples > Car Rental Application.
The login window appears.
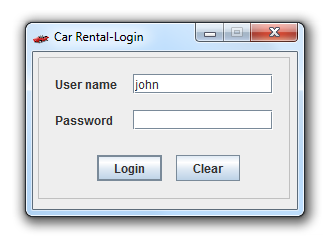
Navigate to the application window Car Rental-Select Date and Location by clicking Login,then New Order.
Optionally, you may test your new test case now to ensure that it properly interfaces with the AUT, or you may skip the next step. We will run the test again later, after the action lines have been encapsulated.
Optional: Execute test case
TC 03of your test.With your test displayed in the editor, do the following:
Click Execute
 on the toolbar.
The Execute Test dialog box appears.
In the Test Modules panel, expand the tree.
Ensure that only the check box for test caseTC 03is selected.
Click Execute.
The test modifies the appropriate fields of the Select Date and Location window of the Car Rental application.
Now, in the editor, we will fold all the new action lines into an action.
Select all the action lines of test case
TC 03, excluding the TEST CASE header line.Right-click within the selection, then click Create Action.
The Create New Action dialog box appears.
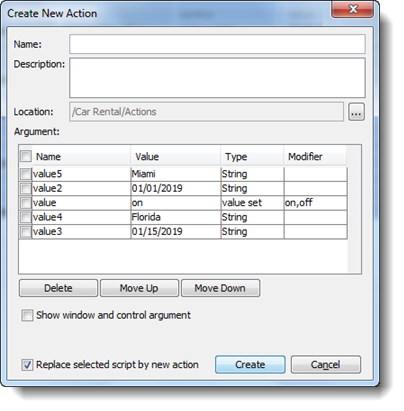
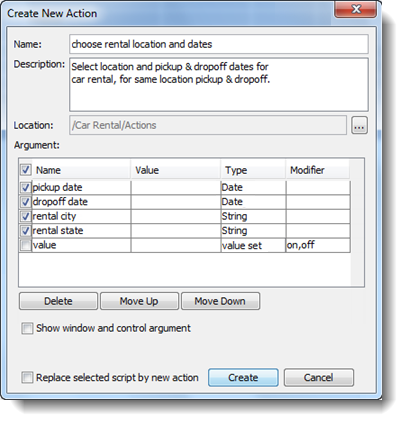
This is very similar to the Create Action dialog box which appears when you create a new user-defined action from scratch. The big difference here is the Argument panel: rather than being empty, this panel is populated with proposed arguments. In effect, what TestArchitect is saying is, “Sure, I can fold your action lines into a simple action, but while I’m at it, I’ve scanned those lines for values, and found a bunch of them. Perhaps you’d like to consider turning some of those values into arguments to the new action. It would certainly make your action a lot more versatile and reusable. (Oh, and by the way, I have no idea what to name those arguments, so I’m just calling them ‘value, value2, value3’, etc. Please feel free to give them appropriate names.)”
Start by giving the new action an appropriate name. Let’s call it choose rental location and dates.
Now, choose which values are to be converted to arguments by selecting their adjacent check boxes. In our case, select the two location values (Miami and Florida) and the two date values. Let’s also give their arguments appropriate names.
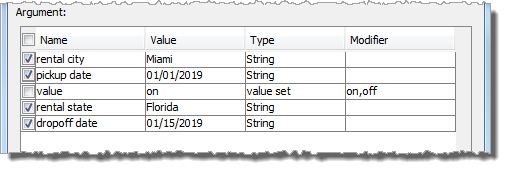
Use the Move Up and Move Down buttons to arrange the arguments into a more sensible order, since that is the sequence in which they will appear when the action is used in a test module. And let’s also change the data types of the date arguments to Date:

Now add a description for your action, and clear the Replace selected script by new action check box. You might also opt to remove the values under the Value column. (Values here become the default values of their respective arguments when the action is created.)
Now click Create.
The new action,
choose rental location and dates, is generated, encapsulating the action lines that were selected, and creatingargumentactions for the values you selected. Click on the action’s tab to view it: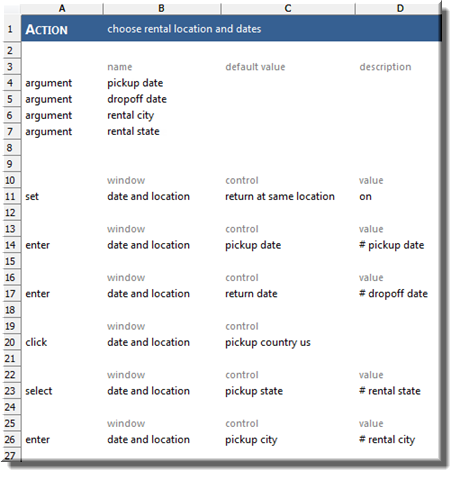
Note that our action is highly parameterized, except for two items. First, it selects the application window’s Return car at the same location check box (line 11), without giving the calling entity a choice in the matter. That’s OK, because we have chosen to define this action as being specifically for single-location rentals. But it also specifies (line 20) that the rental country is the United States, which prevents this action from being usable for Canadian locations. (Note that the Argument panel we just saw didn’t give us an option related to the rental country because the related action is a click, whose arguments are just UI items. Unlike enter or set, it doesn’t involve any value-based arguments.) So let’s modify the action to make it more versatile.
Click on the Information subtab of the action and add rental country to the bottom of the arguments list.
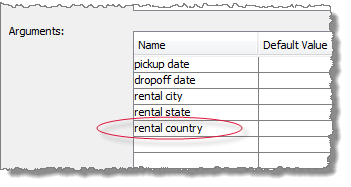
Click back on the Editor subtab and answer Yes when asked if you want to save the changes.
Now, replace the contents of the control argument of the
clickaction line with the expression# "pickup country " & rental country:
Your action now accepts a rental country argument, which accepts the values US or Canada.
Note:Actually, the action itself will accept any values, but only the values US and Canada (of any case) will have a meaningful effect and not result in an error.Return to the test module
My streamlining, and create another test case:Place your cell pointer on a line somewhere below the existing set of action lines (but before the
FINALsection, if any).Click Create New Test Case
 on the toolbar.
A test case line similar to the following is inserted.

In the second column of the new line, assign the test case an ID of
TC 04(if not already set to that value).Press
Tabto advance to the next column, and provide a description for your test case, such ascall the encapsulated action.Insert some blank lines (Ctrl + i) under the
TEST CASEheader, so that the test case has at least 10 rows.
Place the cell pointer into the leftmost cell at least three rows beneath the
TEST CASEheader, enter the name of the action you just created, and pressEnter.The actions is displayed along with header labels reflecting the arguments you created in your action:

Complete the action line by adding values to the arguments. Use any values you wish or, to duplicate the effect of your previous test case, use the identical values:

Optional: Execute test case
TC 04of your test.With your test displayed in the editor, do the following:
Click Execute
 on the toolbar.
The
Execute Testdialog box appears.In the Test Modules panel, expand the tree.
Ensure that only the check box for test case TC 04 is selected.
Click Execute.
The test modifies the appropriate fields of the Select Date and Location window of the Car Rental application. If you opted to execute test case
TC 03earlier, and you have chosen to use the same data values, you should now see identical results.
You have seen how to encapsulate an existing set of action lines into a user-defined action in TestArchitect. The judicious use of user-defined actions is key to writing good tests with the Action Based Testing methodology, ones that are more readable, maintainable, modular and reusable.
Folding your action lines into a functionally-equivalent action is a useful convenience. As you learn to write ABT tests, however, you should become better and better at knowing in advance what functionality should be incorporated into actions, and implement such functions as discrete actions in the first place. To know how to create a user-defined action from scratch, see Creating new actions.
In this lesson, we’ve seen, among other things, how values are passed from a calling entity into an action. Next, we will learn how values can be returned from your action to the caller.