Creating mappings with the Interface Viewer
Use the Interface Viewer to create mappings for user interface elements.
Before proceeding: Ensure that the my login interface entity file has been saved and is displayed in the editor.
- If you have not already done so, start the Car Rental application by selecting Start > All Programs > TestArchitect > Samples > Car Rental Application.
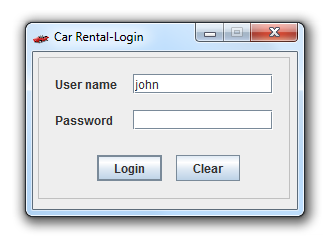
The login window appears.

Click the Interface Viewer button
 on the toolbar.
TestArchitect Client is minimized, and the Interface Viewer utility launches.
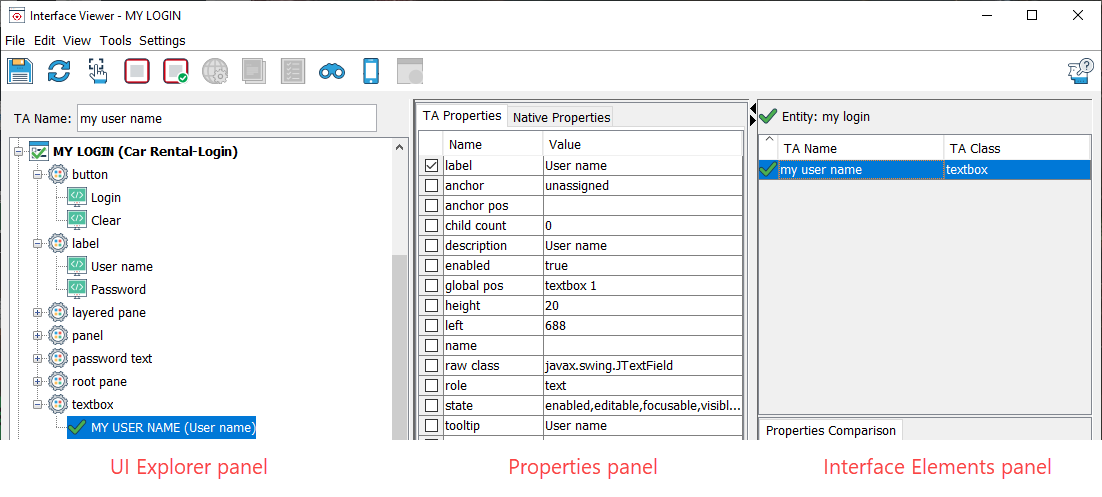
In the Interface Viewer’s UI explorer panel (at left), expand the textbox subnode of the MY LOGIN(Car Rental-Login) tree by clicking its icon
 . Optionally, go ahead and expand a few other subnodes. Select the MY USER NAME subnode under textbox.
If the node for the Car Rental-Login window does not include the text MY LOGIN, it is not mapped to your interface entity, and the reason is most likely that you did not have the
my logininterface entity open in the editor when you launched the Interface Viewer.Note:Note the two green check marks in the UI Explorer. These indicate successful mappings between
- the open interface entity, MY LOGIN, and its matching window, Car Rental-Login
- the interface element for TA name MY USER NAME and the control with label = User name (as indicated in the Properties panel).
Note:TA names are case insensitive, and are always displayed in upper case in the Interface Viewer’s UI explorer Tree.
So far the only control that your interface definition enables you to work with is the User name control, due to the mapping you created manually. Now you will use the Interface Viewer to create another interface element definition.
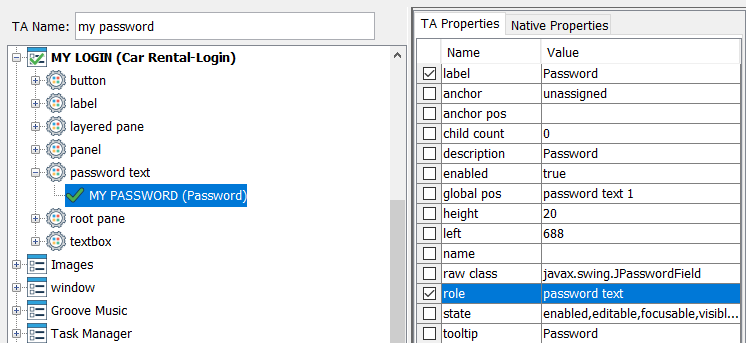
Expand the node for the class
password textby clicking the icon next to it.
A single child node appears indicating an unmapped Password field:

Double-click the Password subnode.
The Interface Viewer creates a tentative mapping for this control (tentative because it has not yet been written to the interface entity), with a suggested TA name of PASSWORD.

- Note:This new mapping can be saved to the existing interface entity. Before saving, rename the mapping with your own TA name:
a. Right-click the Password subnode and select Rename.b. Type
my passwordand PressEnter.
c. With the label property selected, select the
roleproperty on the TA Properties tab.
Click Save
 and close the Interface Viewer.
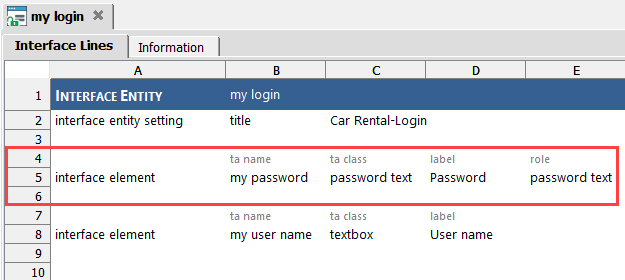
A new interface element for the Password textbox control is now included in the interface entity, which should resemble the following figure:
 Note:During a test run, when TestArchitect reads this line, it will interpret it as
“Within the window whose TA name is my login, assign the TA name my password to the control which is of class
password textand has the properties label and role set to Password and password text, respectively.”Note:In case you’re wondering, yes, this is overkill. In fact, because there is only one control of class password text in the entire window, both of the two property-value pairs at the end of the definition could be removed. If so, TestArchitect would still be able to uniquely identify the control.
Next, you will put your interface definitions to use in a test.
Related concepts